Help Your Children Learn to Use Scissors
Teaching children to use scissors does not have to be difficult. Children who have delayed motor skills may need strategies to facilitate learning how to cut.
Assessing Scissors Skills
One of the first things I like to do when teaching children how to use scissors is a quick assessment of their current needs. Some children may have never seen or used scissors before while others have attempted to and have not been successful.
Bilateral coordination is one of the important skills that some students may be lacking, so I first try to determine hand dominance. Hand dominance is generally considered to be developing up until age 5 or even older for some kids, but younger kids will still show signs of it.
The first time I assess for scissors skills, I present everything at the child’s midline (paper directly in front of them, scissors in the middle of the paper). For some students, it is better to hand them the scissors, but again, I hand them to them at their midline so that I can see which hand they take them with. That is usually going to be their dominant hand.
For younger students, or students that I think have not developed any skills yet, I will give them a thin strip of paper (1-inch or so). This will often allow them to snip through the paper by just closing the scissors and they can experience success.

Choosing Scissors for Cutting Skills
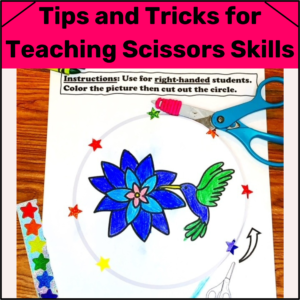
The scissors that I choose are important. For my younger students, students with developmental delays, or students with spasticity (such as cerebral palsy or post brain injury), I start with loop scissors (shown in picture above) or spring-loaded scissors. The student only needs to squeeze them shut then the scissors open when they relax their hand. Spring-loaded scissors that can be changed to non-spring-loaded can be useful to grow with the child. In addition, spring-loaded generally have finger holes so the student becomes familiar with finger placement.
Once a child has mastered the loop scissors and spring-loaded, we will move to regular child-sized scissors. For students who have difficulty opening these, or who tend to close them all the way with each cut (therefore having to reposition on the paper each time), I like to add a rubber band on the tips to prevent them closing all the way.

Type of Paper for Learning How to Use Scissors
When learning to cut, using thicker paper is easier for kids to hold. Be aware that if it is too thick, it may be difficult to cut through. The thicker paper gives more proprioceptive feedback compared to thin paper so can be helpful for kids with sensory processing delays.
Developmental Process of Learning How to Use Scissors
Finally, pay attention to the developmental process of learning to cut. The general order is as follows: snipping randomly on edge of paper, snipping to cut through a thin piece of paper, cutting across a thin piece of paper on a line, cutting across short lines (I start with 2-inches then progress to 6-inches), cutting out large shapes (circles and squares), and finally complex shapes.
Strategies for Teaching How to Use Scissors
When teaching children how to use scissors, I have used many strategies. One that kids tend to like is putting stickers along the line that they need to cut and having them cut through the stickers. You can also put a sticker with their favorite theme as a target to cut towards. When cutting shapes, many kids tend to stop too soon and cut off the edge of the shape. I add stickers just beyond the edge and tell them to cut to the sticker then turn the page. Highlighting the line that they are cutting will help some students. I usually use a yellow highlighter but have also used other colors with success. When I create worksheets for cutting, I make the lines wide to facilitate success. Directional arrows can also be used to get kids started.

Keep in mind that kids who are right-handed should cut shapes in a counterclockwise fashion and kids who are left-handed should cut in a clockwise fashion. Add stickers to show finger placement for kids who have difficulty manipulating paper.
I hope these tips have given you some ideas to help facilitate success with your kids!
CLICK THE PICTURE ABOVE TO GET MY FREE SAMPLE PACKET
Miss Jenny OT


